June / July 2021, Part II:
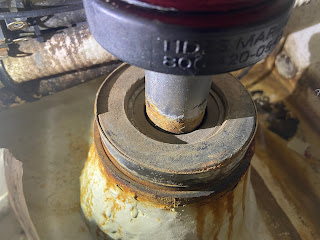
OK, so now that I finally had the props off, it was time to pull both shafts, and examine the cutlass bearings and shaft seals. Again, easier said than done. Since I also wanted to replace the rudder shaft seals, I decided to drop both rudders first, to provide a bit more room to work. You can see the rudder shaft seal leakage right here:
There was a spare seal in the spare seal carrier, visible at the top of this picture, and most repair yards would simply have ripped out the old seal, cleaned the shaft, and dropped the replacement seal into position, but I wasn't about to do that without examining the rudder shaft for wear. So, I disconnected the tiller arms from each rudder, loosened the retaining collars, and dropped both rudders out of the boat. That also made it easier to pull the old seals. I'm glad I went the extra mile, as the replacement seals were pretty old, so I wound up throwing them out too.
Next up - pulling the shafts. Once the props are removed, the next step is to unbolt the couplers from the transmissions, and then separate the shafts from the couplers. The Cruisers 500/520 is a bit tight under the engines, but there is room to work on the inboard side of the couplers. The trick is to loosen one bolt and nut, then spin the shaft a bit to access the next one. There are a total of ten, so it takes a bit of time. Then, the shaft can be pulled aft a few inches, exposing the retaining nut inside the coupler:
There is just barely enough room to get in the gap between the transmission output flange and the coupler to straighten out the cotter pin, and push/pull it out through the access holes. Also, judging by the grinding marks inside the coupler, someone has been here before......
After I got the cotter pin out, I found that there's no way to fit a conventional socket / ratchet on the nut, due to the tight clearance between the coupler and trans flange. So, time for yet another special tool:
This one took a few hours to machine up, but it was well worth it (yes, it's on the boat, and will remain there). The pins fit precisely into the brass nut, and the other side is fitted with a standard 1/2" drive for a breaker bar or ratchet. When I returned to the boat with this tool, I had both nuts off in 5 minutes, and I thought "well, I just have to pop the coupler off the shaft now..."
Yeah, so funny. The shaft is tapered to match the coupler, and after years of running, they were damn tight. So yet again, I took a series of measurements, and went back to the shop to make the 3rd and final special tool:
This is a 3/4" thick steel flange, drilled around the perimeter in the same pattern as the coupler, and with a centrally located 3/4" bolt that protrudes about 3/8". Once I had this made, I simply placed it against the coupler, with the central bolt against the shaft. I had the central bolt extended so the flange couldn't rest flat against the coupler, and then started putting the bolts and nuts in around the perimeter. Once I had 5 or 6 of them installed (I skipped every other hole), I just started tightening the perimeter bolts one by one. After I went around once, and started on the 2nd lap, the shaft popped right out of the flange - no fuss, no muss, and no impact needed. Just smoothly applied pressure.
So, finally, I had both shafts out of the boat. A little side note here - the shafts on a 500/520 are 2.5" in diameter, and about 6 feet long, so they weigh a bit. Be careful!
I brought the shafts, couplers, and props to my preferred prop shop, and had them assess everything. The shafts turned out to be mint, as were the couplers, but the props did need some work. I'll get into that in the next post.


Comments
Post a Comment